Wednesday, October 7, 2015

File upload in Selenium / WebDriver using Robots

We have discussed uploading a file using using Webdriver Sendkeys method and Using AutoIT Tool. Now here we will look into an other way of doing file upload using Robot class and StringSelection class in java.
Robot class is used to (generate native system input events) take the control of mouse and keyboard. Once you get the control, you can do any type of operation related to mouse and keyboard through with java code.
There are different methods which robot class uses. Here in the below example we have used 'keyPress' and 'keyRelease' methods.
keyPress - takes keyCode as Parameter and Presses here a given key.
keyrelease - takes keyCode as Parameterand Releases a given key
Both the above methods Throws - IllegalArgumentException, if keycode is not a valid key.
We have defined two methods in the below example along with the test which is used to upload a file.
package com.easy.upload;

import java.awt.Robot;
import java.awt.Toolkit;
import java.awt.datatransfer.StringSelection;
import java.awt.event.KeyEvent;

import org.openqa.selenium.By;
import org.openqa.selenium.WebDriver;
import org.openqa.selenium.WebElement;
import org.openqa.selenium.firefox.FirefoxDriver;
import org.testng.annotations.Test;

public class UploadFileRobot {

 String URL = "application URL";
 @Test
 public void testUpload() throws InterruptedException
 {
  WebDriver  driver = new FirefoxDriver();
  driver.get(URL);
  WebElement element = driver.findElement(By.name("uploadfile"));
  element.click();
  uploadFile("path to the file");
  Thread.sleep(2000);
 }
 
 /**
     * This method will set any parameter string to the system's clipboard.
     */
 public static void setClipboardData(String string) {
  //StringSelection is a class that can be used for copy and paste operations.
     StringSelection stringSelection = new StringSelection(string);
     Toolkit.getDefaultToolkit().getSystemClipboard().setContents(stringSelection, null);
  }
 
 public static void uploadFile(String fileLocation) {
        try {
         //Setting clipboard with file location
            setClipboardData(fileLocation);
            //native key strokes for CTRL, V and ENTER keys
            Robot robot = new Robot();
 
            robot.keyPress(KeyEvent.VK_CONTROL);
            robot.keyPress(KeyEvent.VK_V);
            robot.keyRelease(KeyEvent.VK_V);
            robot.keyRelease(KeyEvent.VK_CONTROL);
            robot.keyPress(KeyEvent.VK_ENTER);
            robot.keyRelease(KeyEvent.VK_ENTER);
        } catch (Exception exp) {
         exp.printStackTrace();
        }
    }
}
Uploading a file with Selenium Webdriver using AutoIT

Uploading a file with Selenium Webdriver

There are different ways to handle file uploads with Selenium Webdriver.
The First and the Easy way is simple case of just finding the element and typing the absolute path of the document into it.
HTML code should look similar to this :
<input type="file" name="datafile">
Syntax:
//Find the element of upload button and send the path
WebElement element= driver.findElement(By.name("datafile"));
element.sendKeys("C:\Users\Easy\Desktop\testfile.txt");
NOTE: This works only when the textbox is enabled. So please make sure that the input element is visible.
The OTHER WAY to Handle File Upload
What If there is no text box / input tag to send the file path using Sendkeys method????
You will have only a button (Customized button) and when click on browse button, browser opens a window popup and to select the file from windows, And as we know selenium will not support OS controls.
We can use AutoIt tool (open source tool) which takes the responsibility to upload the file.
About AutoIT : AutoIt v3 is a freeware BASIC-like scripting language designed for automating the Windows GUI and general scripting.
We need to call the AutoIt script after clicking on the upload button. Immediatly ater clicking on Upload button, the control should be transfered to AutoIt which takes care of uploading the file.
Syntax:
Runtime.getRuntime().exec("AutoIt .exe filepath");
Download and Install Autoit tool from Download AutoIt
Example:
Runtime.getRuntime().exec("D:/fileupload.exe");
AutoIt script should have the following:
Step 1 : First After clicking on 'Upload' button, the cursor will move to the Window popup.
The below step should be the first line in the script. 'File Upload' is the name of the window popup when opened with Mozilla. The name changes depending on the browser.
Mozilla - File Upload
Chrome - Open
and for IE - Choose File to Upload
WinWaitActive("File Upload")
Step 2 : Once the window popup is active, we should send the path of the document which need to be uploaded.
 Send("Full path of the document")
Step 3 : After that we need to click on Open button which will upload the document.
Send("{ENTER}")

Data Driven Framework with Apache POI – Excel - Selenium / WebDriver

Data Driven Framework with Apache POI – Excel

Most commercial automated software tools on the market support some sort of data driven testing, which allows you to automatically run a test case multiple times with different input and validation values. As Selenium Webdriver is more an automated testing framework than a ready-to-use tool, you will have to put in some effort to support data driven testing in your automated tests. I usually prefer to use Microsoft Excel as the format for storing my parameters. An additional advantage of using Excel is that you can easily outsource the test data administration to someone other than yourself, someone who might have better knowledge of the test cases that need to be run and the parameters required to execute them.

Reading data from the Excel

We need a way to open this Excel sheet and read data from it within our Selenium test script. For this purpose, I use the Apache POI library, which allows you to read, create and edit Microsoft Office-documents using Java. The classes and methods we are going to use to read data from Excel sheet are located in the org.apache.poi.hssf.usermodel package.

How to do it…

1) Download JAR files of Apache POI  and Add Jars to your project library. You can download it from here. That’s all about configuration of Apache POI with eclipse. Now you are ready to write your test.
2) Create a ‘New Package‘ file and name it as ‘testData’, by right click on the Project and select New > Package. Place all of your test data in this folder (package) whether it is a sql file, excel file or anything.
3) Place a Excel file in the above created package location and save it as TestData.xlsx. Fill the data in the excel like below image:
Apache-POI-15
4) Add two constant variables (testData package path & Excel file name) in the Constant class

  1. package utility;
  2. public class Constant {
  3. public static final String URL = "http://www.store.demoqa.com";
  4. public static final String Username = "testuser_1";
  5. public static final String Password = "Test@123";
  6. public static final String Path_TestData = "D://ToolsQA//OnlineStore//src//testData//"
  7. public static final String File_TestData = "TestData.xlsx"
  8. }
5) Create a ‘New Class‘ file, by right click on the ‘utility‘ Package and select New > Class and name it as ‘ExcelUtils‘. First we will write basic read/write methods

package utility;
import java.io.FileInputStream;
import java.io.FileOutputStream;
import org.apache.poi.xssf.usermodel.XSSFCell;
import org.apache.poi.xssf.usermodel.XSSFRow;
import org.apache.poi.xssf.usermodel.XSSFSheet;
import org.apache.poi.xssf.usermodel.XSSFWorkbook;

public class ExcelUtils {
private static XSSFSheet ExcelWSheet;
private static XSSFWorkbook ExcelWBook;
private static XSSFCell Cell;
private static XSSFRow Row;
//This method is to set the File path and to open the Excel file, Pass Excel Path and Sheetname as Arguments to this method
      
public static void setExcelFile(String Path,String SheetName) throws Exception {
    try {
    // Open the Excel file
    FileInputStream ExcelFile = new FileInputStream(Path);
    // Access the required test data sheet
    ExcelWBook = new XSSFWorkbook(ExcelFile);
    ExcelWSheet = ExcelWBook.getSheet(SheetName);
    } catch (Exception e){
    throw (e);
    }
    }
      //This method is to read the test data from the Excel cell, in this we are passing parameters as Row num and Col num
      public static String getCellData(int RowNum, int ColNum) throws Exception{
      try{
      Cell = ExcelWSheet.getRow(RowNum).getCell(ColNum);
      String CellData = Cell.getStringCellValue();
      return CellData;
      }catch (Exception e){
      return"";
      }
      }
        //This method is to write in the Excel cell, Row num and Col num are the parameters
        public static void setCellData(String Result,  int RowNum, int ColNum) throws Exception {
        try{
        Row  = ExcelWSheet.getRow(RowNum);
        Cell = Row.getCell(ColNum, Row.RETURN_BLANK_AS_NULL);
        if (Cell == null) {
        Cell = Row.createCell(ColNum);
        Cell.setCellValue(Result);
        } else {
        Cell.setCellValue(Result);
        }
          // Constant variables Test Data path and Test Data file name
              FileOutputStream fileOut = new FileOutputStream(Constant.Path_TestData + Constant.File_TestData);
              ExcelWBook.write(fileOut);
              fileOut.flush();
              fileOut.close();
              }catch(Exception e){
              throw (e);
       }
       }
       }

6) Once we are done with writing Excel functions we can go ahead and modify the SignIn_Action module to accept the test data from excel file.


package appModules;
import org.openqa.selenium.WebDriver;
import pageObjects.Home_Page;
import pageObjects.LogIn_Page;
import utility.ExcelUtils;

// Now this method does not need any arguments
public class SignIn_Action {
public static void Execute(WebDriver driver) throws Exception{
//This is to get the values from Excel sheet, passing parameters (Row num &amp; Col num)to getCellData method

ExcelUtils.setExcelFile();

String sUserName = ExcelUtils.getCellData(1, 1);
String sPassword = ExcelUtils.getCellData(1, 2);
Home_Page.lnk_MyAccount(driver).click();
LogIn_Page.txtbx_UserName(driver).sendKeys(sUserName);
LogIn_Page.txtbx_Password(driver).sendKeys(sPassword);
LogIn_Page.btn_LogIn(driver).click();
        }
}

Note: In the later chapters we will see how to parameterise the row column as well, as we also have to avoid hard coded values in the scripts. This is just to give you an idea to use Excel and we will move forward step by step towards proper framework.

7) Create a ‘New Class‘ and name it as Apache_POI_TC by right click on the ‘automationFramework‘ Package and select New > Class. In this we will read the values from the Excel sheet to use them as the test data and write the test result in the Excel.


package automationFramework;
import java.util.concurrent.TimeUnit;
import org.openqa.selenium.WebDriver;
import org.openqa.selenium.firefox.FirefoxDriver;
import pageObjects.*;
import utility.Constant;
// Import Package utility.*
import utility.ExcelUtils;
import appModules.SignIn_Action;
public class Apache_POI_TC {
private static WebDriver driver = null;
public static void main(String[] args) throws Exception {
        //This is to open the Excel file. Excel path, file name and the sheet name are parameters to this method
        ExcelUtils.setExcelFile(Constant.Path_TestData + Constant.File_TestData,"Sheet1");
        driver = new FirefoxDriver();
        driver.manage().timeouts().implicitlyWait(10, TimeUnit.SECONDS);
        driver.get(Constant.URL);
        SignIn_Action.Execute(driver);
        System.out.println("Login Successfully, now it is the time to Log Off buddy.");
        Home_Page.lnk_LogOut(driver).click();
        driver.quit();
        //This is to send the PASS value to the Excel sheet in the result column.
        ExcelUtils.setCellData("Pass", 1, 3);
}

}


Give it a run, see how beautify your script will execute the code.

8) Once it finished open the Excel file and check for the result.
Apache-POI-16
Your Project explorer window will look like this now.
Apache-POI

How to Handle SSL Certificate issues in Selenium / Webdriver

SSL CERTIFICATE ERROR HANDLING IN SELENIUM WEBDRIVER FOR CHROME,IE AND FIREFOX BROWSER

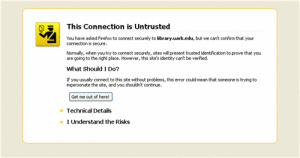
firefox-certificate-errorSome time we get these SSL certificate errors or notification in Selenium WebDriver when we try to execute our scripts, but Selenium WebDriver has provided us to give capabilities to handle this certificate error in Chrome Driver/Firefox /IE browsers.
Here I am posting the code that would help you in resolving the SSL error mainly in Chrome Browser
DesiredCapabilities capability = DesiredCapabilities.chrome();
capability.setCapability(CapabilityType.ACCEPT_SSL_CERTS, true);
driver = new ChromeDriver(capability);
Above script will help you in accepting all the SSL certificate in Chrome and by doing so you would not get any SSL error while executing your code.
While in Firefox following code will work.
In Firefox you need to apply this code
import org.openqa.selenium.WebDriver;import org.openqa.selenium.firefox.FirefoxDriver;import org.openqa.selenium.firefox.FirefoxProfile;import org.openqa.selenium.firefox.internal.ProfilesIni;public class acceptSSLCerti {
 public static void main(String[] args) { //Class ProfilesIni details ProfilesIni allProfiles = new ProfilesIni(); // Use FirefoxProfile Constructor FirefoxProfile myProfile = allProfiles.getProfile("CertificateIssue");
myProfile.setAcceptUntrustedCertificates(true);
myProfile.setAssumeUntrustedCertificateIssuer(false); WebDriver Driver = new FirefoxDriver(myProfile);
Driver.get("WebSite URL were you are facing this Certificate error");}}
For IE browser we can use following code, But in IE we have two way to handle this problem..
Case 1:  In this we will click on “Continue to this website (not recommended)” and for the same we are going to use document.elementById(“Id”)
So let’s see the code

import org.openqa.selenium.WebDriver;
import org.openqa.selenium.ie.InternetExplorerDriver;
import org.testng.annotations.Test;
public class HandlingSSLErrorInIE{
private WebDriver driver;
@Test
public void TestSSLerror() {
//Download IEDriver exe and past in project
System.setProperty("webdriver.ie.driver","IEDriverServer.exe");
driver = new InternetExplorerDriver();
//Open WebSite for time being let's take http://xyz.com
driver.get("https://xyz.com");
//now we are going to use javascipt ,This will click on "Continue to this website (not recommended)" text and will //push us to the page
driver.navigate().to("javascript:document.getElementById('overridelink').click()");
}
Case 2: Second method is pretty similar to Chrome SSL Handling code

DesiredCapabilities capabilities = new DesiredCapabilities();
capabilities.setCapability(CapabilityType.ACCEPT_SSL_CERTS, true);
System.setProperty("webdriver.ie.driver","IEDriverServer.exe");
WebDriver driver = new InternetExplorerDriver(capabilities);
So by following all the above code snippet we can handle SSL Certificate Error in all major browser like IE, Firefox and Chrome browser.
If you like this post then please like and share this post!!